
Well, it was a year ago today that I made a similar post (“Long time no write!“) so I figured why not make a similar post today of my photographic adventures of the year! 🙂 It’s been a busy 12 months that’s for sure! Below are just a few examples of my excursions with my camera! [Read more…]
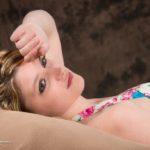
Creating a Sunny Window in studio
Posted on May 18, 2015 ·

So I had this brain storm the other day, and I figured out a way to create the illusion of a bright sunny window where no window exists at all. The following photo is the fruit of my labor, and the rest of the article explains how I created it.
[Read more…]OK, So I Have My Modeling Portfolio, Now What?
Posted on April 11, 2015 ·

This question comes up a lot, and instead of reinventing the wheel here – the best advice I have is to look over these articles that are posted over on ModelMentors.com
[Read more…]Expressions, Hands, and Posing
Posted on March 21, 2015 ·
When you watch a model that has some modeling experience under her belt, you’ll notice that they are constantly on the move. After they have been informed about the general theme for the session – they just go – holding only briefly between poses for the shot (2 to 3 seconds), and then moving on for the next pose. They need very little direction. This is good, and more productive for everyone concerned. The idea is not to rush the session through – but to keep everyone focused and on subject. [Read more…]
Information Packet for New Models
Posted on March 7, 2015 ·

Most new models trying their hand in the modeling scene, often don’t know what to expect or how to prepare for a modeling session. I usually then fumble around looking up various information on the internet for them to read up on, to help clarify things. But it always feels a bit cumbersome at first, so I decided to put together my own info packet right here – sort of a one stop shop for how I, as a professional photographer, work with models when helping them build their portfolios.
[Read more…]Creating a Rembrandt like still life
Posted on November 22, 2014 ·

Last night I decided that I wanted to try to create a Rembrandt like still life photo using a few squash and apples… To set the scene, I placed an old eight sided table in the middle of my studio, and then ran the backdrop down the wall and then draped it over the table.
[Read more…]Exposure!!
Posted on November 14, 2014 ·
I learned the mechanics of proper exposure many, many years ago – back before digital was even invented, back when I shot with film with my old Pentax K1000. So when I picked up my first DSLR a few years ago, I was ahead of the game somewhat from most. People are buying DSLR’s today, and really don’t know how to use them beyond Programmed Auto mode. As a matter of fact, until recently, I still relied on one of the semi-auto modes myself when doing my photography.
For action photography, like barrel racing, I knew I needed a fast shutter speed to “freeze” the action. So I would use Shutter Priority mode on the camera (“S” on Nikons, and I believe “Tv” on Canons) and manually set the Shutter Speed to 1/500 of a second, and then let the camera automatically adjust the Aperture.
[Read more…]Studio: First light!!
Posted on November 13, 2014 ·

Yesterday I received the drapes, and two of the backdrops for my basement studio. Today I received the last backdrop for a total of three different looks!
I set everything up and the drapes fit perfectly, hanging slightly above the basement floor. The area I have sectioned off is 10.666 feet across, and 11 feet deep. The end opposite of the backdrop however is open ended, so I can move the camera back as far as 22 feet if I have to, but in trying it out, 13 or 14 feet back seems to be pretty much ideal.
[Read more…]
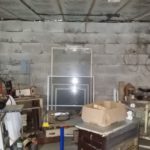
Studio Hardware
Posted on November 11, 2014 ·

I’m almost ready to try out the new studio! I purchased some galvanized pipe and ceiling hooks today and mounted everything in the locations where I had planned for a “test fit.” The pipe above the lower perpendicular pipe, will be used for the backdrop. It’s mounted 12″ away and parallel to a concrete block wall. It can only have one ceiling hook on each end to support it because the backdrops are one solid piece 10 ft wide. The lower pipes running perpendicular to the block wall will be used for the blackout curtain walls – one on each end of the backdrop. These can have multiple ceiling hooks per pipe because the curtains are narrower, multiple sections (54 inches each, 4 per pipe). I’m now just waiting for the curtains and backdrops to be delivered!!
[Read more…]
Studio.. (Basement cleaning)
Posted on November 7, 2014 ·
Oh my goodness!! I made a clean spot!!! It doesn’t look like much, but I was 4 hours getting from “Before” to “After” and there’s still quite a lot to do! The pale green dresser on the right – that’s going too, or at the very least, moved.
[Read more…]